Pick a Bluehost Plan
In short: Visit Bluehost.com and choose the best pricing plan for you.
Bluehost is known for its WordPress hosting plans – it’s even an officially recommended host by WordPress. To choose the best plan for you, go to Bluehost’s WordPress section and scroll down to the “Choose Your Way to WordPress” section.

We recommend:
- The $2.95/month plan for new and/or small websites. You’ll have a great amount of bandwidth and storage to start off with, at a very cheap price.
- The $9.95/month plan for growing websites adding more content and experiencing more traffic.
- The $12.95/month plan for large websites with an established audience, especially ecommerce websites that need extra security to process payments.
Top Tip: You don’t have to choose a WordPress-specific plan. We’ve covered Bluehost’s WordPress plans here because they’re the most relevant, but you can also go for one of Bluehost’s more general shared plans, which range from $2.95 – $13.95 per month. For a full guide to the different plans available, you can check out our Bluehost Pricing review.
Once you’ve chosen a plan, just keep in mind that the super-low price you’re seeing only applies to your first term – once it’s time to renew the plan, you’ll have to pay a more expensive renewal price. This is typical of most hosting providers, but it can be frustrating if you’re not expecting it!
The difference between introductory and renewal prices isn’t too bad with Bluehost:
- The WordPress Shared plan increases from $2.95 to $8.99/month
- The Managed WordPress plan increases from $9.95 to $19.95/month
- The WordPress Online Stores plan increases from $12.95 to $24.95/month
1. Choose a Domain Name
In short: Pick a new domain for your website, or use one that you already own.
Once you’ve selected a plan, you’ll be asked to choose a domain for your site, which is basically like the “address” where people can find your site on the web. If you already have a domain that you want to use, you can enter it at this stage.

On the drop-down menu under “Create a new domain”, you can choose your domain name extension (like .com, .net, or .org).

If you’re having trouble brainstorming a new domain, don’t worry – you can skip this step and come back to it later
2. Finish Signing Up
In short: Enter your address and payment information, and purchase your Bluehost plan – just keep an eye out for extra costs that you don’t really need!
After you’ve chosen a domain name, you’ll be ready to check out with your new Bluehost plan.
On this last page, you’ll be asked to enter your name, address, and payment information. You’ll also confirm which hosting plan you want, and how long you want your first term to last.

Top Tip: Avoid additional costs that you don’t need. On this checkout page, you’ll notice a “Package Extras” section:

You’ll also notice that a few extras, like Codeguard Basic and SiteLock Security, are automatically added to your basket. These tools are nice to have, and you may want to purchase them, but they’re definitely not required! So make sure to take a good look at the Package Extras section, and uncheck any extra costs that you don’t want.
Once you’ve entered and reviewed your information, and unchecked any costs you don’t want, just click the green “Submit” button at the bottom of the page, and you’ll be the proud owner of a new Bluehost account.
3. Log In and Install WordPress
In short: Sign in to your Bluehost dashboard and set up WordPress in just a few clicks.
At this point, you’re ready to actually install WordPress with Bluehost. And this might be the easiest step in the whole process, because Bluehost provides free WordPress installation, so you don’t have to do any of the technical stuff yourself.
User Review: Harry Clarkson-Bennett, Red Orange Peach
 We haven’t just used our own experience to help write this guide. We also spoke to other users, like Harry Clarkson-Bennett. Harry installed WordPress with Bluehost to create his website, Red Orange Peach, which recommends the best cruelty-free cosmetic and household products.
Harry found the installation process really easy – “almost idiot-proof,” in fact! – but what else does he have to say about Bluehost?
“There are other providers which I know offer faster hosting, but I picked Bluehost because it was the cheapest option I could find. Bluehost’s control panel and interface is remarkably easy to use, and integrates well with other services you need. For example, I wanted to use Cloudflare with my site, and it was supremely easy to set up with Bluehost.
It’s also very easy to manage your updates, plugins, and advanced access. So if you work with a developer, you can grant them access for things like the FTP (File Transfer Protocol) – so you shouldn’t need to do much work at all.”
Just sign in to your Bluehost dashboard and click on the “My Sites” tab from the left side menu:

On the next screen, click “Create Site” in the upper right corner, and then choose whether you want to create your site with the WordPress.org content management system or the WordPress.com website builder.
(Since you’re using your own hosting provider, WordPress.org is the better option for you. For more info, you can read our explanation of WordPress.com vs WordPress.org.)
Once you’ve chosen a WordPress option, you’ll enter a name and tagline for your site, which will act as an intro for most visitors:

Then you can click on the “Advanced” tab and enter the login information that you want for your WordPress account.

On the next screen, Bluehost will suggest some optional (and free this time!) WordPress plugins that you may want to install at this stage.
For example, WP Forms is useful for creating simple surveys and contact forms where visitors can keep in touch with you, and MonsterInsights is a tool that works with Google Analytics to help you analyze your traffic.
Expert Tip: Thomas Jepsen, Web Developer – Atlantic Aspiration
 Using SEO Plugins For Success
“Make sure to install a search engine optimization plugin, like Yoast SEO, where you can set up the right noindex directives to make certain pages won’t appear in search results.
If you’re using Yoast SEO, go to “Search Appearance,” then “Taxonomies.” Then choose that “Categories” and “Tags” shouldn’t be shown in search results. These are typically considered “thin pages” which could get you penalized by Google.”
Plugins or no plugins, you’ll then click “Next” at the bottom of the page, and voilà! You’ve successfully installed WordPress with Bluehost.
Need Help?
It’s really simple to install WordPress with Bluehost, so you likely won’t run into any trouble. But if you do have any issues or questions, Bluehost’s support team is available 24/7 – and we were very impressed with their service.
In our web hosting research, Bluehost scored a perfect 5/5 for help and support, and it surpassed our expectations the most compared to any other provider we tested.
We found Bluehost’s live chat team to be really responsive, and its searchable knowledge base to be full of useful articles and tips.
And we weren’t the only ones who were impressed. Here’s what Harry had to say about his experience with the support team:
“Bluehost’s support is actually pretty stellar. My staging site broke, so I spoke to their online chat team and they set up a new one within minutes.”
5. Launch Your Site!
In short: From your Bluehost dashboard, log in to WordPress and start customizing your site.
Congratulations! At this point, WordPress is installed on your Bluehost account. Now it’s time to design your site and get it ready for visitors to see.
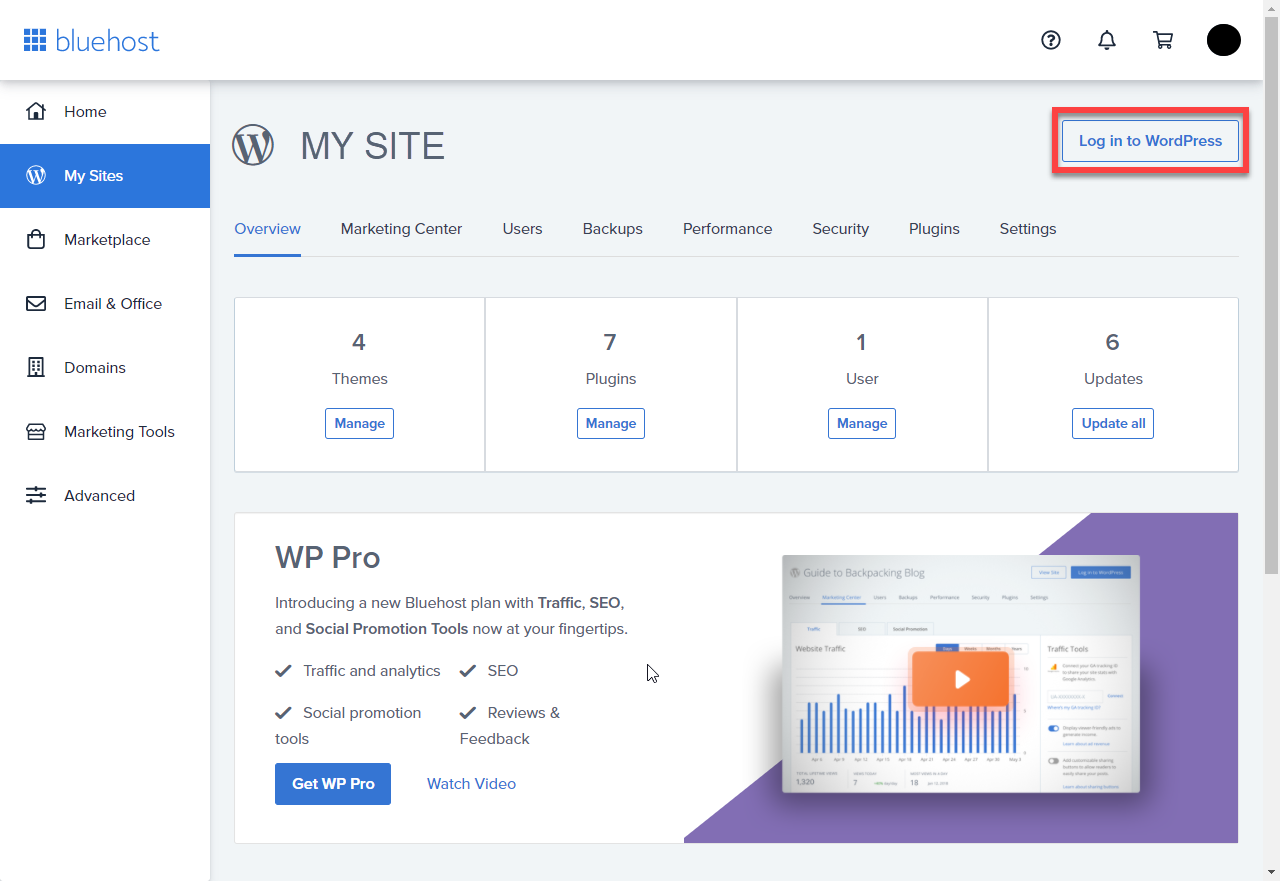
First, navigate back to the “My Sites” tab, and then click on “Manage Site”.

On the next screen, click “Log in to WordPress.”
You’ll be taken to your WordPress dashboard, where you can start making your site your own. This is where you can customize your site’s layout (or choose a pre-built theme if you’d rather that), design all kinds of pages, and write new content for blog posts or news updates.
Don’t worry about how your work-in-progress looks – at this point, anyone who tries to visit your site will see a “Coming Soon” message, so you can have fun experimenting before you actually publish your site.
When you’re ready to go live, just click “Launch your site” in the WordPress dashboard. You can revert your site back to the “Coming Soon” message if you want to, so don’t worry about launching too soon – it doesn’t have to be permanent!
6. Optional: Switching a WordPress Site to Bluehost
In short: Bluehost will migrate most WordPress websites for free. If your site doesn’t qualify for free migration, you can either do it manually or pay $149.99 for Bluehost to move it for you.
If you already have a website that’s hosted somewhere else, and you’re thinking of switching to Bluehost, this section’s for you.
Bluehost offers free migration for most WordPress websites, so in most cases it’s really easy to switch to Bluehost. If your website doesn’t qualify for the free migration, you can either manually switch it to Bluehost or pay Bluehost to do it for you.
Click on the option you’re interested in below to see how it works:
Using Bluehost’s Free Migration Service
Manually Migrating to Bluehost
Using Bluehost’s Paid Migration Service
Not sure if you should switch your WordPress site to Bluehost? Check out our in-depth Bluehost Review to see if this host is really right for you.
7. Conclusion: How to Install WordPress with Bluehost
Here’s a quick recap of the five steps we’ve just covered:
How to Install WordPress on Bluehost
- Pick a Bluehost Plan
- Choose a Domain Name
- Finish Signing Up
- Log In and Install WordPress
- Launch Your Site


8 comments on “How To Install WordPress in Bluehost – WordPress Installation Guide”
Pingback:
How to add Shortcode in Elementor Page - InformersProPingback:
how to add html, css and javascript to wordpress Using ShortCode PluginPingback:
2023’s Best Valentine’s Day up to 70% discount in Hosting. - InformersProPingback:
Why Elementor Pro is More Beneficial for Web Design and Development - InformersProPingback:
How to make Free Website on Wordpress by Follow simple 7 Steps - InformersProPingback:
How to Install Plugin in Wordpress - InformersProfiro coin
Very nice post. I just stumbled upon your blog and wanted to say that I’ve really enjoyed browsing your blog posts. In any case I’ll be subscribing to your feed and I hope you write again soon!
Pingback:
WordPress.com to WordPress.org – Complete Guide